Install the Surface SDK SP1 Workstation Edition on x64
Update 11/20/09: The Surface SDK is now available to everyone at the new Surface website! The instructions below should continue to work just fine…let me know if they don’t.
Update 10/29/09: It appears that the version of the SDK available from the Microsoft Partner site comes as a straight .exe file. To extract this back into the MSI file to follow the instructions below, execute the following command:
"Microsoft Surface SDK 1.0 SP1, Workstation Edition.exe" /extract c:\surface
This should spit out a MSI file to the c:\surface directory and you can continue on with the instructions below. Thanks to Tim Hurst for the info!
The Surface SDK SP1 Workstation Edition was released this week and while it will install (but is still unsupported) on Windows 7, it will not install on a 64-bit machine. The installer has changed a bit, so my previous instructions will not work with this installer, but I have managed to get the new package to install and run. And here’s how…
As before, this is a totally unsupported setup, so if official support from Microsoft is required, this is not for you.
Please note that you will still need to meet the other hardware and software requirements of the SDK.
To perform the actions in this guide you will need to install Orca, a tool for editing MSI files, included with the Windows SDK. Unfortunately, this utility isn’t available separately and will require you to download the full SDK to get it. You can download the Windows Vista or Windows 7 SDK here.
1) Extract the MSI to its individual files
This can be done with the following command performed in an elevated cmd window:
msiexec /a SurfaceSDKWE.msi /qb TARGETDIR=c:\surface (or some other TARGETDIR of your choosing)
When complete, you will have a new directory at TARGETDIR filled with a smaller MSI and all the files contained within the original MSI.
2) Remove the platform check from the MSI
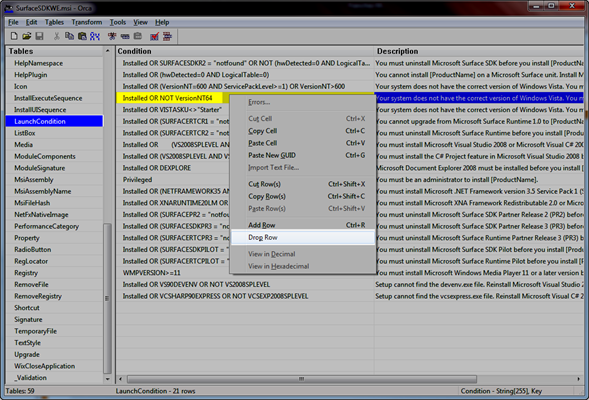
Open the newly extracted SurfaceSDKWE.msi file in Orca. Select LaunchCondition from the left pane. In the right pane, select the row labeled Installed OR NOT VersionNT64, right-click, and select Drop Row. This will remove the check for a 64-bit OS.
After the rows are dropped, save the MSI using the standard File –> Save menu option.
3) Patch the setupcustomaction.exe file
This executable is called during the SDK installation process. Because the installer will launch as a 64-bit application, so will this executable, which will force it to write some registry values into the wrong location. Therefore we have to patch this file using the corflags.exe utility included in Visual Studio and the .NET SDK.
If you have the full Visual Studio installed, simply open an elevated Visual Studio Command Prompt from the Start Menu and the path to corflags.exe will automatically be loaded. Otherwise, you should find this in the C:\Program Files\Microsoft SDKs\Windows\v6.1\Bin directory and you can set your PATH environment variable appropriately.
With the path to corflags.exe in your PATH environment variable, change to the following directory:
<TARGETDIR from above>\Microsoft Surface\v1.0
Inside this directory, run the following command:
corflags setupcustomaction.exe /32bit+ /force
You will get a warning that the file is strong named signed. You can safely ignore this.
4) Install the SDK
Now that the MSI and setupcustomaction.exe have been patched, run the extracted and patched SurfaceSDKWE.msi file from the TARGETDIR location, not the original MSI file. As long as you have the other prerequisites installed, the SDK will install without issue.
5) Patch the executables / Build and fix the samples
These steps are identical to last time, so I will just link to the original blog post here.
And there we have it. A patched and working Surface SDK SP1 running under Vista/Windows 7 x64. As always, run this at your own risk, but let me know how it works out for you if you give it a try.


