Sandcastle and API Documentation
I’ve received a few emails recently on how I created the API documentation for my Wiimote library so I thought I’d answer here with a brief tutorial.
The answer, in case you didn’t read the post subject, is Sandcastle. Sandcastle is a tool developed by Microsoft which builds MSDN-style help files by using reflection and XML comments from the source code of a project. Out of the box, Sandcastle is command line driven and kind of a pain to deal with, so I highly recommend the very easy to use Sandcastle Help File Builder (SHFB) application also hosted on CodePlex. This front-end provides a simple UI for setting options and building your help file in just a few minutes. The rest of this post assumed you have both Sandcastle and Sancastle Help File Builder installed.
Building documentation is easy. First, add XML documentation comments directly to your source code. You can do this by typing 3 forward slashes in Visual Studio above your class/method/type/property/etc. and the IDE will fill in the documentation template. For example, if you had a method definition which looked like this:
public int DoSomething(string s, bool b)
and you typed /// above the method name, Visual Studio would generate the following:
/// <summary>
///
/// </summary>
/// <param name="s"></param>
/// <param name="b"></param>
/// <returns></returns>
public int DoSomething(string s, bool b)
At this point, it is your responsibility to fill in the tags which were generated. Also note that there are a variety of other tags that can be added to provide additional information in the documentation output, such as a code sample, links to other documentation, etc. You can find a list of all documentation tags here.
After the XML documentation is created, you must tell the compiler to generate the output XML documentation file. In Visual Studio, this can be done by going to the project’s properties, selecting the Build tab, checking the “XML Documentation File” checkbox and providing an output filename.
When the project is compiled, you will now find that XML file in the path given. By itself the file is pretty much useless, but it will allow Sandcastle to generate everything it needs to know about your project.
To generate the documentation, Open Sandcastle Help File Builder and choose New Project from Visual Studio Project from the Project menu. Locate your Visual Studio solution or project file and select it. This will create a default Sandcastle configuration which will import your generated XML file and the associated assembly file(s) which will be pulled apart using reflection. At this point, you can simply select Build Project from the Documentation menu and an HTML Help 1.0 CHM file will be created with the default Sandcastle settings.
Sandcastle Help File builder allows a variety of customization options to be set for your generated documentation and it’s worth going through what’s available in the UI to create the documentation you require. The UI itself documents every setting so creating what you need is amazingly easy. For example, in my Wiimote documentation, I set the PresentationStyle to vs2005, change the copyright text fields, feedback email, etc. to create a custom-tailored set of docs for my library.
Another great feature is the ability to add additional custom content to the generated documentation. I add some additional pages which provide a general overview to the library and copyright/license information. To add additional content, create a new directory and add .topic files to it. Each .topic file is simply an XML file which gets passed through a transformation by SHFB that matches the chosen presentation style. The base schema looks like the following:
<?xml version="1.0" encoding="utf-8"?>
<!DOCTYPE bodyText [ <!ENTITY nbsp " "> ]>
<topic xmlns:MSHelp="https://msdn.microsoft.com/mshelp">
<!-- The page title -->
<title>My Title</title>
<!-- The body text for the topic -->
<bodyText>
Some body text<br/>
And some more
</bodyText>
</topic>
The full list of tags can be found in the SHFB documentation, but the above example is enough to create a page which will mirror the generated documentation style. Simply fill in the <title> tag and the <bodyText> file, and save the .topic file.
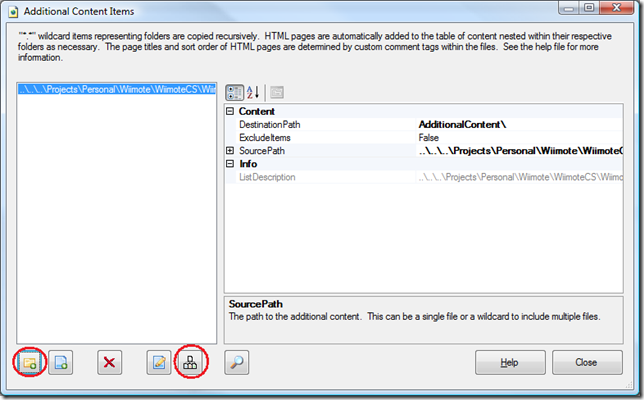
To add these .topic files to the generated documentation, select the AdditionalContent line item in SHFB and then click the … button. In the Additional Content Items dialog, click the Add folder icon in the lower left corner, and located the directory which contains the .topic files created above. Then, click the Site Map button to arrange the order, indentation, etc. of the additional pages.
Once the order is set in the Site Map dialog, click the Save button to save a .sitemap file. This will be used by SHFB builder to determine where these entries are placed in the output file. You will notice that the ContentSiteMap entry in the SHFB UI will point to the .sitemap file just created. Build the project in SHFB again and you will now have documentation with the additional content added as you specified.
And there you have it. MSDN-style documentation generated with minimal effort. I have only covered the basics here, so be sure to read through the documentation provided by all of these tools so you’re aware of everything that is possible in creating documentation for your projects.

