NuGet-enabled WiimoteLib and ThinkGearNET
With the official release of NuGet and the NuGet gallery, I decided to try it all out by uploading the current versions of WiimoteLib and ThinkGearNET to the gallery. The process was pretty smooth, but I learned a little bit along the way which I thought I’d share.
So what’s NuGet?
From their own page: NuGet (formerly known as NuPack) is a free, open source developer focused package management system for the .NET platform intent on simplifying the process of incorporating third party libraries into a .NET application during development.
In short, this means you can right-click and add a reference to a third party library without having to download it yourself, extract it, locate it manually on your drive, deal with dependencies, etc. All of this is handled automatically, as is finding and integrating new versions of those libraries with your projects.
NuGet as a User
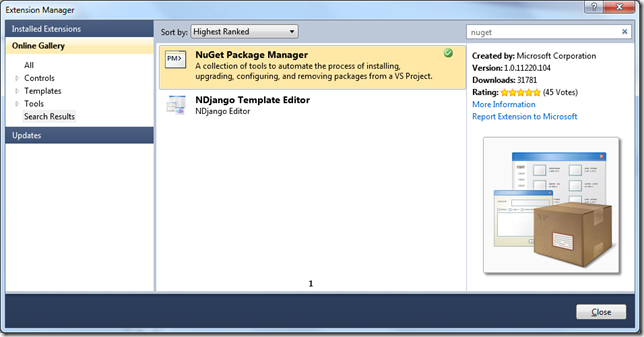
If you want to use NuGet to download packages, you’ll first need to install the NuGet Package Manager extension for Visual Studio 2010. You can find this in the Visual Studio Extension Manager or at the NuGet CodePlex site.
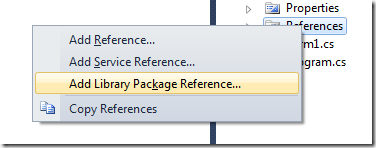
Install the extension and you’ll find a new right-click entry when adding a reference: Add Library Package Reference….

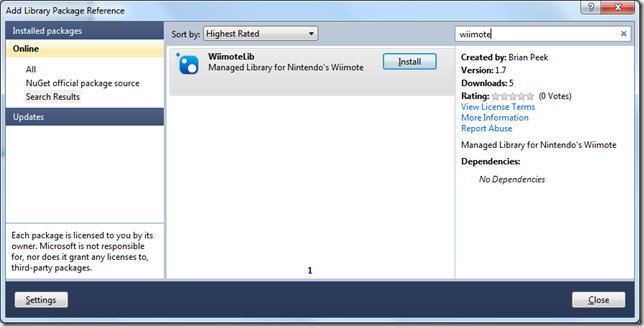
Select this and you’ll be presented with a dialog similar to that of the Extension Manager. You can see/search what’s installed, what’s in the gallery, and which packages you already have installed have updates available. As an example, you can search for WiimoteLib or ThinkGearNet and pull down the package.
In either case, a reference will be set to the assembly, and, with the way I created the package, you’ll get a readme file as well as an Extras directory with additional documentation, license info, samples, etc.
NuGet as a Package Developer
If you are the developer of a third party library, getting it up to the NuGet Gallery for the rest of the world to consume is pretty simple. Full documentation on all of the advanced features is located on CodePlex, but I’m going to explain the basics using WiimoteLib as an example.
First, you will need to download the command line NuGet Command Line Tool from CodePlex to create packages. Put this executable in a location in your PATH or somewhere else that’s easily accessible.
Next, you will need to organize your library, documentation, etc. in a way that NuGet can handle. Three main directories will exist inside any package. Use those which make sense for your distribution.
|
Directory |
Usage |
| \lib | The assemblies that will be referenced by the user’s project when this package is installed |
| \content | Anything in here will be copied to the user’s project root and added to the project/solution |
| \tools | Executables that will get copied to the target project and will be added to the PATH environment variable |
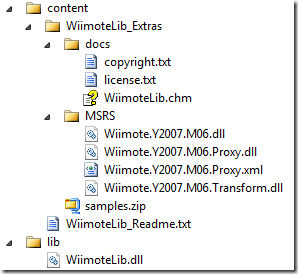
For my packages, I only needed the lib and content directories. Inside of the lib directory, I copied the WiimoteLib.dll assembly. Inside of the content directory, I created a directory named Wiimote_Extras in addition to a Wiimote_Readme.txt file. Inside the Wiimote_Extras directory, I placed a zipped copy of the WiimoteLib samples, a docs directory containing the CHM help file and license files, and a MSRS directory containing the MSRS libraries for the Wiimote. So, my full directory list looked as follows:

One of the issues I ran into was including the samples as projects/source directly. When they get added to the project as shown, they become source code for the project, and that can cause conflicts. So, to work around the issue, I just zipped up the projects and made them easily accessible. Just remember if you include a source code file directly in that content directory, it will become part of the user’s project.
You can go much further with this by specifying subdirectories for different versions of your library with multiple subdirectories, PowerShell scripts, etc. but for my needs this was all that was required.
The final piece of the puzzle is creating a manifest file, called the .nuspec file, which details the package and its contents. You can find full documentation for the .nuspec file on CodePlex, but I’ll cover the basic items that are required. Here is the .nuspec file for WiimoteLib:
<?xml version="1.0" encoding="utf-8"?>
<package>
  <metadata>
    <id>WiimoteLib</id>
    <version>1.7</version>
    <title>WiimoteLib</title>
    <authors>Brian Peek</authors>
    <description>Managed Library for Nintendo's Wiimote</description>
    <summary>A library for using a Nintendo Wii Remote (Wiimote) from .NET.</summary>
    <language>en-US</language>
    <licenseUrl>http://wiimotelib.codeplex.com/license</licenseUrl>
    <projectUrl>http://wiimotelib.codeplex.com/</projectUrl>
    <tags>Wiimote Nintendo Games</tags>
  </metadata>
</package>
Of the items listed, only the id, version, authors and description fields are required. The rest add some useful data that will get displayed in the package manager and on the Gallery site.
|
Element |
Description |
| id | A unique identifier for the package. Make this something short but unique. |
| version | The version of the library this package contains |
| title | A pretty title for the package |
| authors | A comma-delimited list of authors |
| description | A longer description of the package |
| summary | A shorter description of the package |
| language | Locale ID for the package |
| licenseUrl | URL pointing to the license file on the web |
| projectUrl | URL pointing to the project homepage on the web |
| tags | A space-delimited list of tags to help find the package when searching |
When uploading to the NuGet Gallery, everything but the id and version can be added or changed on the site itself. These items are used for display both on the NuGet Gallery site, as well as inside the package manager in Visual Studio.
So, create your .nuspec file and save it somewhere to be reference for the next step.
With the directory organized and the .nuspec file in place, the package can be created with the nuget.exe command line tool downloaded earlier. At its simplest the command to create a package is as follows:
nuget pack <.nuspec file> –b <root package directory>
Running this command will generate a file with a .nupkg extension. This is your final package ready to upload to the Gallery!
Currently, if you wish to upload a package, you need to register on the NuGet Gallery and then send an email to the address specified to have your account activated. Once activated, go to the Contribute tab on the site, click Add New Package and follow the steps. When complete, your package will be available to download by anyone with the package manager installed.
Conclusion
There is obviously a ton more to NuGet, the package manager, the package creator, etc. and I highly recommend going through the documentation on the NuGet CodePlex site to get the full details. Your package may be far more advanced than this and require additional configuration, so please read up! Otherwise, take a look at the gallery and get started using some third party libraries in your projects!

